The Eglu Go which we launched in September 2009 is the new version of the Eglu Classic MK 2 which was launched in 2005.
The Classic and the Eglu Go are made of the same secure weld mesh, are the same size and are both easy to clean.
With the Eglu Go:
Possibility of changing this into the Eglu Go Up;
Lighter Rear Panel which gives access to the inside;
Droppings tray, roosting bars and nest box all slide out.
With the Eglu Classic:
You can open the side eggport door and collect your eggs.
It is the only chicken house in the permanent collection of the Victoria and Albert Museum because of it’s cool design!
This entry was posted in Chickens on November 24th, 2019 by mathieugrassi
There are several causes of feather loss. Hens usually go through a moult in the Autumn, usually around October or November. The first year tends to be a small moult affecting the head and neck area but the second year is a little more drastic. Hybrids moult more than pure breeds and often look ready plucked. The whole process takes around 3-4 weeks to be completed and starts at the neck, moves along the back, breast and ends at the tail. It happens annually to replace old worn out feathers. Sometimes dramatic total body moults occur where nearly all the feathers fall out overnight but they do grow back. You should start to see and feel little quills poking through the flesh which grow and open out into lovely new feathers which will keep her warm and dry throughout the winter. Make sure you provide a good quality layers meal for them because the moult takes a lot out of your hens. Don’t give too many treats as these don’t really provide enough nutritional value but wheat is very good as a scatter feed in the afternoons or you could perhaps give a wheatgerm porridge made with warm water to keep their little bodies warm overnight. Adding Poultry Spice to their layers meal or a Chicken Tonic to their water will help correct any mineral imbalance caused by losing and growing new feathers as they contain lots of minerals and will help the hens over the moulting process. Adding protein to the diet can also help so things like hard boiled eggs, tuna canned in spring water rather than brine which is too salty or live mealworms are good, protein rich foods. Egg production often takes a break during the moult as so much energy is put into growing the new feathers but once they are fully feathered again, the eggs should return.
Another cause of feather loss is feather pulling by another hen. The neck and back area tends to be a prime target, as is the vent area. You can get sprays to use on the bullied bird which make her feathers taste unpleasant to the other birds and this usually deters pecking. If the skin is red, sore or broken, separate the injured hen straight away and you can use Veterinary Wound Powder on her to help stem the bleeding and promote healing. Hens are morbidly attracted to the colour red and will peck at wounds until they are in a dreadful state if nothing is done so Gentian or Purple Spray is very effective as it stains the skin purple and this makes it a much less obvious target for the bully. You can also use Stockholm Tar which acts like a sticky black plaster, deterring further pecking whilst allowing the wound to heal underneath. With my own hens, I’ve found that some of these sprays cause the feathers to clump together though and this can make them more of a target for a bully so a puff of Veterinary Wound Powder or even household cornflour in an emergency disguises the sore area effectively and helps stop bleeding. If any hen develops a wound of any kind, remove them and allow it to heal for a few days before reintroducing them to prevent the wound being pecked.
A broody hen will pluck the feathers from her breast and abdomen to line the nest to help protect her eggs so if she’s displaying any odd behaviour or is clamped to the nest all day, this may be the cause. However, there is also a slight possibility that she might be allergic to any nesting material you are using. Some hens seem to have skin problems when they are in contact with shredded paper or some of the hemp based bedding. If you are using any of these, it might be worth taking them out and replacing them with something like wood shavings which are sold as rabbit/guinea pig bedding as these tend to be non-allergic. Sudocrem sold for nappy rash in babies is very soothing for sore skin in hens too so it might be an idea to try gently rubbing some onto the bald, red areas to see if this helps soothe any irritation.
There could also be another reason for baldness and that is skin parasites. Dirty vent feathers, lots of scratching and dustbathing, hunched or withdrawn hens and soft shelled eggs are often indications that your hen has an infestation too. Mites can’t be seen easily with the naked eye but they leave the skin looking sore, red and featherless. Lice can be spotted quite easily. The hot spots where lice tend to hide are around the vent, under the wings, round the abdomen and chest and the neck area. Ruffle the feathers against the direction of growth and look for little scuttling creatures or tiny cream eggs stuck to the feather shafts. If you come across any, you can get louse/mite powders from various sources including poultry feed suppliers/farm suppliers and some large petshops. Apply it to all your hens and repeat the treatment after a week to catch any eggs which might have hatched out. Depluming mites don’t respond to some of the mite powders on the market so if there’s no improvement, try one which has Pyrethrum or Permethrin in as these are very effective against this particular mite.
Red Mite don’t live on the hens but live inside the hen house and move onto the hens during the night so if you check in all the corners, pull out roosting bars if you can, check around the roof for signs of infestation. They aren’t particularly easy to spot as they are only about 1mm long and are grey before feeding and red after due to the blood that they suck from the hens and this blood sucking can lead to anaemia and lethargy. If you have a red mite infestation in your chicken coop, you may see tiny blood spots on the hens eggs and there may also be a greyish powder which can be seen around the ends of the perches. If you wipe the undersides of the perches with a clean white paper towel and find red streaks on it, this will show that there are red mite in the coop. Spreading Vaseline or nappy cream on the ends of the roosting bars and in the ledges where these bars sit can trap red mite too as they head for dark crevices during the day and any which do become stuck in the sticky cream can be wiped or washed off. To treat an infestation, you will need to remove everything from the coop which can be taken out and spray with a proprietary red mite treatment. Steam cleaners are also very effective for eradicating lice and mites from coops.
This entry was posted in Chickens on November 24th, 2019 by mathieugrassi
It is very difficult in the first instance to tell or diagnose when a chicken reaches maturity if it is going to have any internal issues a sometimes can be somewhat of a surprise to new chicken keepers when chickens fall ill, but judging from your conversation it seems that something is protruding from the vent area, which as you suspect is likely to be a prolapse, this is where the oviduct or egg laying tube has been pushed out of the body in an effort to lay an egg. It is vitally important to separate her from any other hens you might have as they will be attracted to the redness and peck at it causing your hen distress and serious injury.
To treat the prolapse, first wash the prolapsed area with warm water with some antiseptic in it. Dettol or Savlon will be perfect. You may see that there is an egg in the prolapse and you’ll need to carefully try to remove this without breaking it. If you do happen to break it, make sure that you remove any pieces of shell as they may lead to an abdominal infection. Once the prolapse is clean, tuck the hen under your arm with her head covered to keep her calm and gently push the prolapse back into the vent cavity with clean hands or wear clean rubber gloves or even use a clean wet cloth to help you push it back. Keep the hen in a darkened room or box to recover and allow the prolapse to settle back into her body. Many people recommend smearing honey onto the prolapse as this has antiseptic and healing properties. Applying haemorrhoid cream to the vent afterwards can also help. You will need to stop her laying for a while to stop the prolapse from just popping back out again so keep her off her layers meal for a couple of days and only give a very bland diet such as wheat (weetabix mixed with water or Growers Pellets) and if she’s kept in a darkened room for a few days, this will also stop her body from being stimulated into laying. She may need veterinary treatment if it keeps happening and if it does, I’m afraid that the prognosis isn’t good.
Making sure that she has a good intake of calcium may help as this strengthens the muscles in the oviduct and will help her to pass the egg. Limestone Flour mixed with her layers meal will help boost her calcium levels and you can get this from animal feed suppliers in the equestrian section, you add a heaped teaspoon of this to a feeder of pellets or mash a couple of times a week.
Also giving lots of leafy green vegetables can help with the absorption of calcium into the body so would be a good treat for her, cod liver oil given in moderation can also help with the absorption of calcium. If you give a a tablespoon of cod liver oil over a week, this may also help. Don’t overfeed your hen with other treats though as prolapses are more common in overweight hens.
Also have a look at this topic on our forum with advice from the BHWT – https://club.omlet.co.uk/forum/viewtopic.php?f=41&t=62511
This entry was posted in Chickens on November 24th, 2019 by mathieugrassi
You can usually tell if a hen is broody or not fairly easily. If she goes into the nest and doesn’t come back out again and starts making a very strange noise whilst puffing herself up like a football she could be broody. The noise they make is obviously different from the usual range of sounds and can vary from something like a very deep cluck-cluck-cluck rather like horses walking on cobbles to an ear splitting screech! Another sign of broodiness is feather pulling and you may notice that your hen starts plucking them from her breast to line the nest ready for the eggs resulting in an embarrassing bald patch on her belly. You may also spot a strange habit of picking up leaves, twigs, feathers and bits of grass and throwing them over her shoulders in an attempt to make her nest! A normally placid hen can turn aggressive and will peck you if you try to move her and the opposite can happen to a very flighty bird who will suddenly let you cuddle her till the cows come home as soon as she turns broody!
If you act quickly, you can get her to resume egg laying much sooner so try to restrict her access to the nest if possible, although this is usually very difficult if you have other hens who are trying to lay. If she sleeps in the nest, you need to encourage her to sleep on the roosting bars to allow lots of nice fresh air to circulate around her to keep her cool as she’ll get wonderfully warm and cosy overnight and that will just prolong the broodiness. If you put a brick, upturned plant pot, football or even a garden ornament into the nest, this will stop her from roosting in it but remember to remove it during the day so that your other hens can lay eggs. Keep her out of the nest if you can during the daytime. If you spot her in the garden sitting on a nest she’s made from leaves, twigs and feathers, make sure this is quickly removed and move her on or tempt her away with a treat or two.
The urge to go broody is usually caused by a rise in internal body temperature so a quick cold bath usually brings her back to normal and should stop the urge. Dunk the hen’s rear end and abdomen in a bucket of cold water until feathers are soaked. You can do this several times a day. Continue soaking until she stops being broody which should only take a couple of days depending on how long she’s been broody for. It sounds horribly cruel but they actually seem to find it soothing as they are so hot, bothered and cross that a cool bath makes them feel a lot more comfortable. Some people use an old towel to wrap an ice block or fill a plastic bag with ice cubes and put that under the hen in the nest and the coldness soon drives them from the nest. If your hens are in a run and she is determined to sit on the eggs at every possible opportunity, a trick we have used on our own hens might work for her too. We sectioned off the end of the run for our broody hen and put food and water in it. We popped her in there as soon as they woke up in the morning and kept her there until our other hens had laid. As soon as they all had, we removed the barrier, closed the coop door and let her socialise with the others. It took about a week of isolating her out of the way of the nest to break the broodiness but it worked and she’s been fine since. If your hens are free ranging, it’s even easier. You can make a separate run for her using some fruit cage netting or chicken fencing and leave her in there with food and water until the others have laid then you can let her out to join them.
You can let her sit it out if you like as it won’t do her any harm but you won’t get any eggs until she stops being broody and if she’s been sitting for a long time, this could mean no eggs for weeks afterwards. If she does stay put in the nest, try to encourage her to get up once a day to eat, drink and go to the toilet. Broody hens can lose a lot of body weight while they are sitting. It’s important that you check her regularly for lice and mites as they tend to infest broody hens because they aren’t dustbathing and preening as regularly as they normally would. A bad infestation of red mite can kill a broody so it’s also vital to check the coop carefully too as these mites live in crevices and corners of the coop rather than on the bird itself. If you happen to find anything on her, a dusting with a suitable powder or spray, repeated a week later, should remove any stowaways and there are various red mite treatments available for treating the coop. Once she’s lost the urge to sit, she’ll come off the nest and start socialising again and hopefully the eggs should start to arrive again.
A sick hen may also give a false impression that they are broody so be aware that she may not be feeling hormonal at all. A sick chicken will look completely miserable – head tucked into its neck, eyes closed, hunched up shoulders and a droopy tail. They withdraw themselves from the other hens and look unhappy and listless. A hen in lay or even a broody hen should have a bright red comb while a sick hen’s is yellowish and droopy. If you are concerned that she may be ill, it might be a good idea to take her to see a vet to get her checked over properly.
This entry was posted in Chickens on November 24th, 2019 by mathieugrassi
Both the Eglu Go and Eglu Classic houses sleep up to 4 medium to large chickens, however the standard 2 metre run that come with them, are really only suitable for up to 2 chickens, as it is best to try and give each chicken about a metre of run each.
You can extend both the runs, 1 metre at a time, to make them longer which in turn allows you to keep up to 4 chickens… (If you want three chickens, purchase the standard Eglu with a 1 meter run extension, the chickens will be quite happy in a run this size)
The Eglu Go UP can sleep up to 4 medium to large chickens, but again the standard 2 metre run for the Eglu Go UP would only be suitable for 2 chickens. You can also extend the Eglu Go UP run by adding 1metre extensions.
With regards to the Eglu Cube, the house itself will sleep up to 10 small chickens, but with the standard 2 metre run, we would suggest between 4 and 6 chickens, 4 chickens if you were NOT going to let them free range and 6 chickens if you were. The Eglu Cube run extension can also be extended 1 metre at a time, and you can have as many 1 metre extensions as you require.
If you were to have an extension on the Eglu Cube run making it 3 metres long, we suggest the number of chickens be between 6 and 10 chickens, 6 chickens if you were NOT going to let them free range and 10 if you were.
This entry was posted in Chickens on November 24th, 2019 by mathieugrassi
How do I get my chickens to use The Chicken Swing?
Chickens being birds are a bit quirky. Nonetheless, they are extremely habitual and love a routine. It seems the older they get, the slower they are to take on new habits. They are pretty low on the food chain which makes it nice for us because their production rate is high – lots of eggs! However, this makes them cautious and wary of new things. It also makes them group or flock up. They prefer another bird to try new things first. They also remember things surprisingly well. Do you know they will always remember and bond with their hatch mates? They also remember things that scare them and things that reward them with food or pleasure. There are also basic instincts I call “Chicken Things”. One of them is roosting up high in trees. If they perch on moving narrow branches a lot of predators are unable to get them. A moving perch is natural to them.
So, with all that being said, how do we get chickens to get on The Chicken Swing?
Place the swing above the heads of the other fowl in your coop, if you can. You don’t want the swing spooking or hitting other birds (the light – weight design and smooth edges will not injure them.) They are quite able to jump up to four feet or more. A good starting point for full grown/ teenage chickens is twenty inches, or about your knee – height. If you have a small coop and cannot raise the swing that much, don’t worry. Swinging birds will not be able to get the big swing gliding motion or as hard of a kick off as with a full – height set up. But, they will still enjoy the gentler swinging movement of a smaller backyard coop set up. Other fowl will learn to stay clear. They tend to naturally stay out of the way of its movement.
Place The Chicken Swing™ free of obstructions as it swings. For a full swing installation, try to keep it about 18 – 24” away from walls or objects in the swing plane. Smaller coop set – ups have less swing so you can get away with having closer objects. Once they trust the swing, chickens grow more tolerant of kickoffs banging against the coop. (I think that is the goal for some of my hens.) If you have more than one Swing, be sure they can’t collide.
If you have a trusting hen, you can try placing her up on the swing and immediately rewarding her with meal worm treats. Once she is used to that, gently give the swing a pull to get it swinging. Give her a treat eachtime it swings toward you. Soon she will jump up on the swing and start swinging when she hears the bag shake. However, if you try to force her, this method can backfire on you. If the hen gets scared or feels forced, she will relate this to the swing and the other hens might follow her lead of fear. This will set you back. I recommend you do not try this with all your flock, but choose only a few, be very gentle, remain calm, and have rewards ready. Of my 30 hens, only 4 or 5 were taught using treats. Generally, if you get one swinging others will give it a try. I note that in my flock, hens that use the swing most often are not necessarily those trained using treats. Chickens tend to choose their own time. Some are very habitual while others are whimsical. Some are morning swingers. Some swing after their daily egg. Some hop on at odd times. Chickens are chickens, I guess.
One other thing you can use is youth. Young chickens have a lot more free time and are more willing to take risks. Introduce the Swing soon after bringing them home, or at least before they start laying. Not only is it an irresistible adventure for them, it is just too dang cute to watch them carry on and practice moves. I have had older chickens take up swinging. But results are quicker with younger fowl.
Start your chicks out swinging
Whether your chicks are bought from a hatchery or hatched in your coop, chicks will take naturally to The Chicken Swing™ in most cases. The design of our swing allows for chicks just days old to hop up and start trying it out. Its design is lightweight and will not injure them if they are bumped when a hatch mate or fowl of similar size is using it. You may set it up right in your brooder by using the “small coop installation” procedure. Hang the swing from the cross-member using some extra S-Hooks, or by re threading the rope. You can also use a broom stick or shower rod on top of your brooder box and install it similar to full swing method. Just lower the Cross-Member support knot (or untie it) and let the Cross-Member rest on the Side Tie Knot.
For the first few days, set the swing height about two inches above the floor. You may gently place the chick on the swing perch. If they jump off right away, that is just fine. Don’t try to force a chicken to swing. They will get on by themselves after your initial placement if you have been gentle. (No treat is needed with very young chicks.)
After they all seem to have gotten comfortable jumping up on it in this low stage, begin raising it bit by bit as they grow. It is amazing how high those little fluffs can jump! If you have different – sized chicks, you may set a stump or something similar under one side of the swing to help the smaller ones get on. Be prepared to spend way too much time watching them play!
A final point: my flock gets excited when they hear me coming. They stop doing whatever they were doing anticipating garden scraps or treats. This makes it hard to get photos of them swinging. I see them swinging the most when I look out the window out of sight. I had to stop fussing over them every time I went out there so they would just keep swinging when I wanted to take a picture or show them off to a friend. And remember peafowl and turkeys also enjoy The Chicken Swing™!
Fowl Play Products® hopes this information helps to get your backyard flock swinging. If you have older fowl, it might be tricky and take some time to get it going. The saying “Can’t teach an old dog new tricks” is sometimes true. In the end it is up to individual chickens. Not all fowl like to Swing, but we found a whole lot of them do. If you are unable to get your older Chickens to take up swinging, you may want to get a few chicks and introduce The Chicken Swing™ to them. Their example might set the mood for other fowl in your coop.
This entry was posted in Chickens on November 24th, 2019 by mathieugrassi
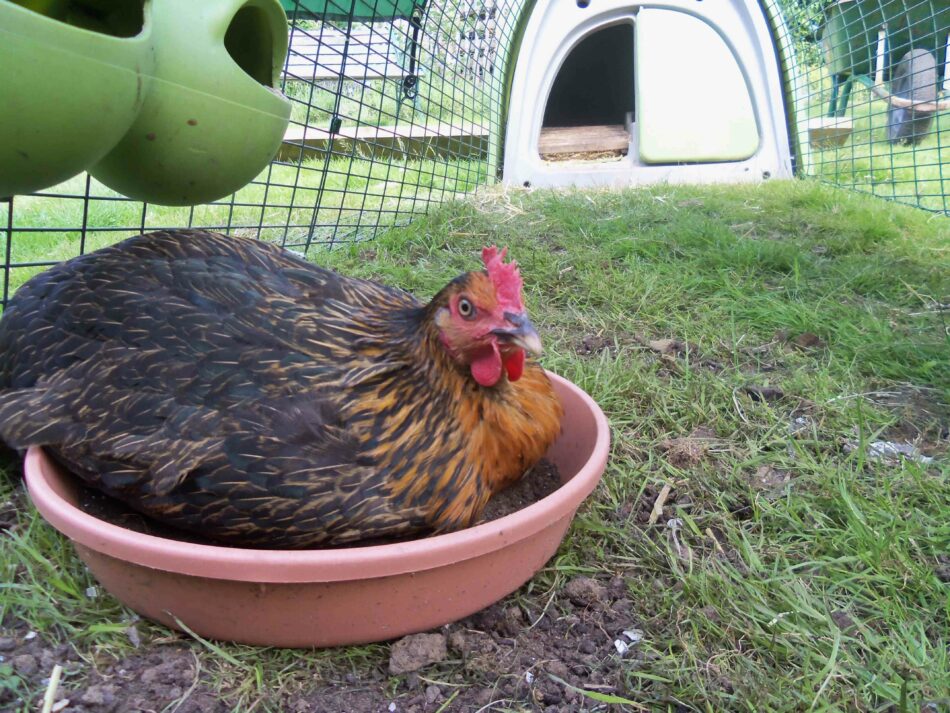
Wondering how to make a dust bath for your chickens? Most hens are perfectly content to dig up their own patch of earth to roll around and fluff their feathers in – but by making your own dust bath from chicken-safe ingredients, you’ll elevate your hens’ bathing from a metaphorical bucket of cold water, to a luxurious bubble (well, dust) bath.
Why do chickens need dust baths?
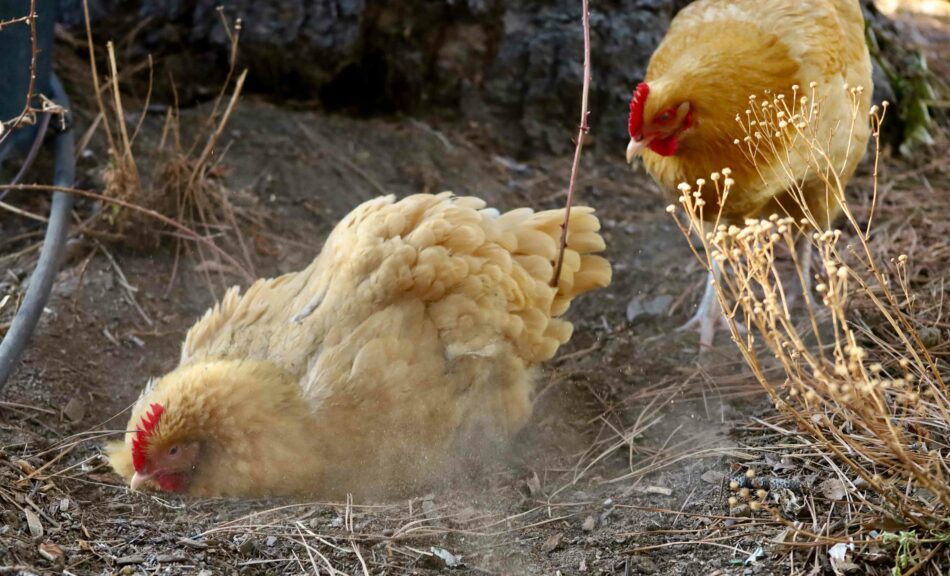
Dust baths are an important part of overall chicken health. Like humans, chickens bathe to get impurities off of themselves and to feel better in general. It may seem counterintuitive to roll in the dirt to get clean, but the right dust bathing spot can absorb moisture and oils on the skin, and can rid birds of mites and lice. Hens aren’t the only birds that enjoy a good roll in the dirt – many wild avian species can be observed taking dust baths.
Chickens will find a soft, dusty or sandy spot and scratch around in order to create a shallow well to plop down into. Once they’ve laid down, hens will wiggle back and forth while flapping their wings in a shoulder-shrugging motion. They will lay on each side and repeat the process until they are sufficiently coated in dust or sand. When they’re done, they’ll hop up and shake vigorously – just like a dog after a bath. After a quick feather preening they’ll be done and dusted (literally).
Bathing this way benefits chickens mentally as well as physically. Just like we may take a warm bath to unwind at the end of the day, dust bathing helps hens relax and feel better. Hens may also hit the dust when they feel like socializing – much like humans in a sauna or hot tub. You may notice hens taking a dust bath with 2 or 3 of their closest flock friends.
Making a dust bathing area for your chickens
Giving your hens a designated dust bathing spot will deter them from creating their own – potentially in your favorite flower bed or another less-than-desirable location. You can use cat litter pans, the tray from a small animal cage or the bottom part of an enclosed dog kennel. But, if you have larger hens or a large flock, they may need more space than these shallow basins have to offer.
Use your imagination to create a dust bathing spot for your hens. Here are some ideas for inspiration:
- An old tire
- Flexible storage tote
- Livestock feeding pans
- Plastic toddler pools
You can also create a permanent dust bathing area by digging out a shape in the ground and edging it with pavers or stones.
Dust bathing areas or containers should have an edge at least 12 inches above the “dust fill line” to avoid hens tossing all of the contents out during their vigorous cleaning sessions. Make sure that the edge is high enough to contain the dust, but also low enough to accommodate your smallest flock members.
Place your flock’s bathing area in a sunny spot. Chickens will seek out sunny areas to bathe in – especially during the winter months. Be sure to keep their bath in an area where it can stay dry. Wet dust bath contents will dry eventually if they get rained on – but depending on the amount it could take several days. Chickens will bathe daily, so try to keep it as dry as possible. A large, elevated chicken coop can provide the perfect spot underneath with just enough sunlight and protection from the rain.
5 things to add to a chicken dust bath
You can make your flock a nutrient-packing dust bath from simple ingredients – many of which you may already have at home.
1. Wood ash
One of the most beneficial ingredients to a good chicken dust bath is something you can find in your own home or backyard. Wood ash from fireplaces or outdoor fire pits are great additions to your hens’ bath. Ash contains vitamin K, calcium, and magnesium, and helps absorb toxins from the skin of chickens. You may see your hens eat some ash, which can also benefit them.
It’s important to only use wood ash if you’re sure of its source. Do not use any ash from treated wood or lumber, as it contains toxic chemicals that can harm your hens.
2. Food-grade Diatomaceous Earth (DE)
This all-natural, silica-rich powder is a powerful anti-parasitic both on your hens and around their coop. DE destroys the exoskeletons of parasites like red mites, lice, fleas, and ticks. In fact, DE can also be added to your hens’ diet for additional parasite prevention. In addition to your flock’s bath, sprinkle some DE around the edge of your chickens’ run and coop to keep pests at bay.
3. Sand
Sand makes a great base for dust baths, but be sure to get the right kind. There are many types of sand available, but steer clear of children’s play sand, as it’s usually treated with chemicals. Aim for a coarse variety like contractor’s or multipurpose sand. Don’t use fine sand on its own – if ingested, fine sand can lead to crop impaction in hens.
The main purpose of sand is to ensure that the rest of your chicken dust bath ingredients don’t clump together, and to add weight to the mixture. If you’re using fine sand, make sure to mix it thoroughly with soil.
4. Top soil or peat moss
If you don’t want to dig up your own dirt, a bag of top soil or peat moss can be used instead. Widely available and inexpensive, bags of top soil and peat moss offer the benefits of natural soil without the hassle of digging it up.
5. Dried herbs
If you’re a chicken keeper that also gardens, you’ll likely have herbs available to add to your hens’ dust bath. Herbs help attract hens to bathing spots in addition to being beneficial for their skin and immune systems. Some herbs to add to your flock’s dust bath include:
- Lavender
- Rosemary
- Thyme
- Mint
- Oregano
- Sage
- Parsley
Don’t forget to save some herbs for your hens’ feed as well as their bath. All of these herbs help to support a healthy hen diet and lifestyle – both inside and out.
Maintaining your chickens’ dust bath
For dust-bath maintenance, simply clean out any droppings that find their way in and refill the contents of the bath when needed. Some hens may bathe multiple times a day, while others may bathe every other day. Depending on how heavy the dust bath usage is, you may want to keep an air-tight container of pre-mixed chicken dust bath for easy refills.
While chicken perches are flock favorites, be sure not to place your hens’ dust bathing area directly below their perching areas to avoid accumulation of droppings. If you have a walk in chicken run, cover the portion of the run that has the bathing area with clear weather protection covers both on the top and sides to prevent the contents from getting wet. This will allow for sunshine to warm their dust bath without the risk of it turning into mud.
Omlet and your hens’ health
Keeping chickens healthy and happy doesn’t have to be a chore. With thoughtfully designed chicken products like the Eglu Cube Chicken Coop, Walk In Chicken Run, and Weather Protection Covers, taking care of your chickens has never been easier. A homemade chicken dust bath is the perfect addition to these purposefully crafted products.
This entry was posted in Chickens on November 24th, 2019 by linnearask